 Skip to content

The check engine light (CEL) can be a source of anxiety for many car owners. When it suddenly illuminates on your dashboard, you may wonder what could be wrong with your vehicle. However, it's important not to panic and instead take appropriate actions to address the issue. In this article, we will guide you through the necessary steps to take when your check engine light turns on. We'll also introduce you to the Ancel AD410, a reliable obd2 diagnostic scanner that can assist you in troubleshooting and resolving check engine light problems.
Importance of Addressing the Issue Promptly
Ignoring a check engine light can lead to more severe problems and potentially costly repairs down the line. It's crucial to address the issue promptly to prevent further damage to the vehicle. By taking immediate action, you can potentially save yourself from unnecessary expenses and ensure your safety on the road.
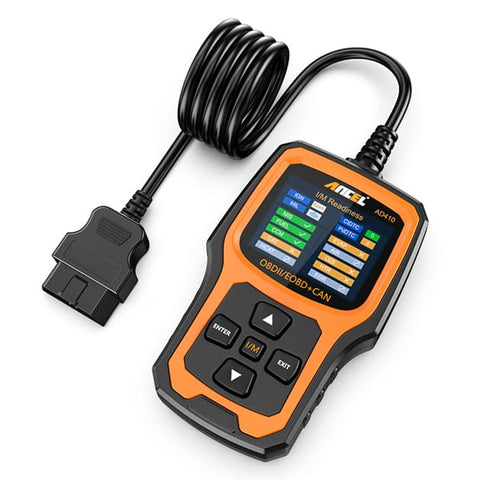
Understanding the Ancel AD410
Ancel AD410 is an advanced diagnostic tool designed for automotive enthusiasts and professional mechanics. It provides comprehensive diagnostic features to enable users to efficiently troubleshoot check engine light issues. Let's take a closer look at this powerful obd2 car scanner.
Overview of the Ancel AD410 Diagnostic Tool
Ancel AD410 is a compact and user friendly obd2 scanner. It has a color display and a simple interface that makes it easy to navigate the various functions. With its OBD2 compatibility it will work with most vehicles built after 1996 equipped with a standardized OBD2 port.
Features and Capabilities
The Ancel AD410 offers a wide range of features and capabilities, including:
- Reading and clearing diagnostic trouble codes (DTCs)
- Displaying real-time data and freeze frame data
- Providing emission readiness status
- Performing oxygen sensor and component tests
- Retrieving vehicle information (VIN, CIN, CVN)
- Supporting multiple languages
How It Can Help with Check Engine Light Issues
The Ancel AD410 is specifically designed to help users diagnose check engine light problems accurately. By connecting the scanner to the OBD2 port of your vehicle, you can retrieve diagnostic trouble codes (DTCs) stored in the ECU. These codes provide valuable information about the underlying issue, enabling you to take appropriate action.
Step-by-Step Guide: Actions to Take When Your Check Engine Light Turns On
When your check engine light illuminates, follow these step-by-step actions to effectively address the issue:
Step 1: Don't Panic and Assess the Situation
When you first notice the check engine light, remain calm and assess the situation. Is the vehicle exhibiting any abnormal behavior or experiencing performance issues? Take note of any specific symptoms or changes in the vehicle's performance.
Step 2: Check for Obvious Issues
Before using the diagnostic tool, perform a visual inspection of your vehicle. Check for any loose or damaged components, such as a loose gas cap. In some cases, a loose gas cap can trigger the check engine light. Ensure that all the fluid levels are within the recommended range.
Step 3: Use the Ancel AD410 Diagnostic Tool
Connect the Ancel AD410 diagnostic tool to the OBD2 port, typically located under the dashboard near the steering column. Follow the instructions provided with the tool to establish a connection with your vehicle.
Relevant:What is the Best Engine Code Reader
1. Connecting the Tool to the Vehicle
Once the tool is connected, turn on the ignition without starting the engine. The scanner will power on and establish communication with your vehicle's ECU.
2. Reading the Diagnostic Trouble Codes (DTCs)
Select the "Read Codes" option on the scanner. It will retrieve the DTCs stored in the ECU. These codes will help identify the specific problem areas.
3. Interpreting the Codes Using the Tool's Database
Refer to the built-in database in the Ancel AD410 to interpret the diagnostic trouble codes. The scanner will provide you with descriptions and potential causes for each code. This information will assist you in narrowing down the issue and determining the appropriate course of action.
Step 4: Understand the Severity of the Issue
Based on the diagnostic trouble codes and their descriptions, assess the severity of the problem. Some issues may be minor and can be addressed without professional help, while others may require expert assistance.
Step 5: Decide Whether to Address the Issue Yourself or Seek Professional Help
Evaluate your comfort level and expertise in handling automotive repairs. If you have the necessary skills and tools, you may choose to address the issue yourself. However, for complex problems or if you're unsure about your abilities, it's advisable to seek professional help.
Step 6: Take Necessary Action to Resolve the Problem
Based on your assessment and decision from the previous steps, proceed to take the necessary action to resolve the issue.
1. DIY Repairs for Minor Issues
If the problem is minor and within your capabilities, you can attempt to fix it yourself. This may involve replacing a faulty sensor, cleaning a clogged component, or tightening loose connections. Follow proper repair procedures and safety precautions.
2. Seeking Professional Assistance for Complex Problems
For more complex or advanced issues, it's best to consult a qualified mechanic or automotive technician. They have the expertise and specialized equipment to diagnose and repair the problem accurately.

Step 7: Clear the Check Engine Light and Verify the Repair
Once the issue is resolved, it's important to clear the check engine light and verify that the repair was successful.
1. Clearing the Codes Using the Ancel AD410
Using the scanner, select the "Clear Codes" option to erase the stored diagnostic trouble codes from the ECU. This will reset the check engine light.
2. Confirming the Issue Is Resolved
After clearing the codes, drive the vehicle and monitor its performance. If the check engine light remains off and there are no recurring issues, it indicates that the problem has been successfully addressed.
Step 8: Regularly Monitor Your Vehicle's Performance
Even after resolving the check engine light issue, it's important to monitor your vehicle's performance regularly. Keep an eye out for any new symptoms or warning signs that may indicate potential problems. Regular maintenance and servicing will help prevent future check engine light issues.
Conclusion
Never ignore the check engine light. By following the step-by-step procedures outlined in this article, you can effectively resolve your check engine light issue and prevent further damage to your vehicle. The Ancel AD410 diagnostic tool proved to be an invaluable companion, providing accurate information and aiding in troubleshooting. Stay proactive and take the appropriate actions to keep your vehicle performing at its best. Come to Ancel website to find out!
FAQs
Can the Ancel AD410 diagnose all car makes and models?
Yes, the Ancel AD410 is compatible with most vehicles manufactured after 1996, regardless of make and model.
How often should I check my vehicle's diagnostic codes?
It's recommended to check your vehicle's diagnostic codes regularly or whenever the check engine light illuminates.
Will the Ancel AD410 reset other warning lights besides the Check Engine Light?
Yes, the Ancel AD410 can reset certain warning lights, depending on the vehicle's make and model.


